
I recently wrote about “Saving Money on Sky Multiroom” and the reasons behind our decision to scale back on our Sky+ HD subscription. Having made the decision I needed to make sure it worked for us, and we got the most from our Sky and BT TV subscriptions.
I established that as my wife and I like to watch a variety of sports – tennis, football, Formula One, ice skating etc, it would be great if we could watch all our premium sports channels from Sky Sports, BT Sport and Eurosport on any TV in the house. As a minimum this would need to include the living room, family room and kitchen. I subsequently researched how to distribute the HD signals from our Sky+ HD and BT Youview+ set top boxes to multiple TVs around our house.
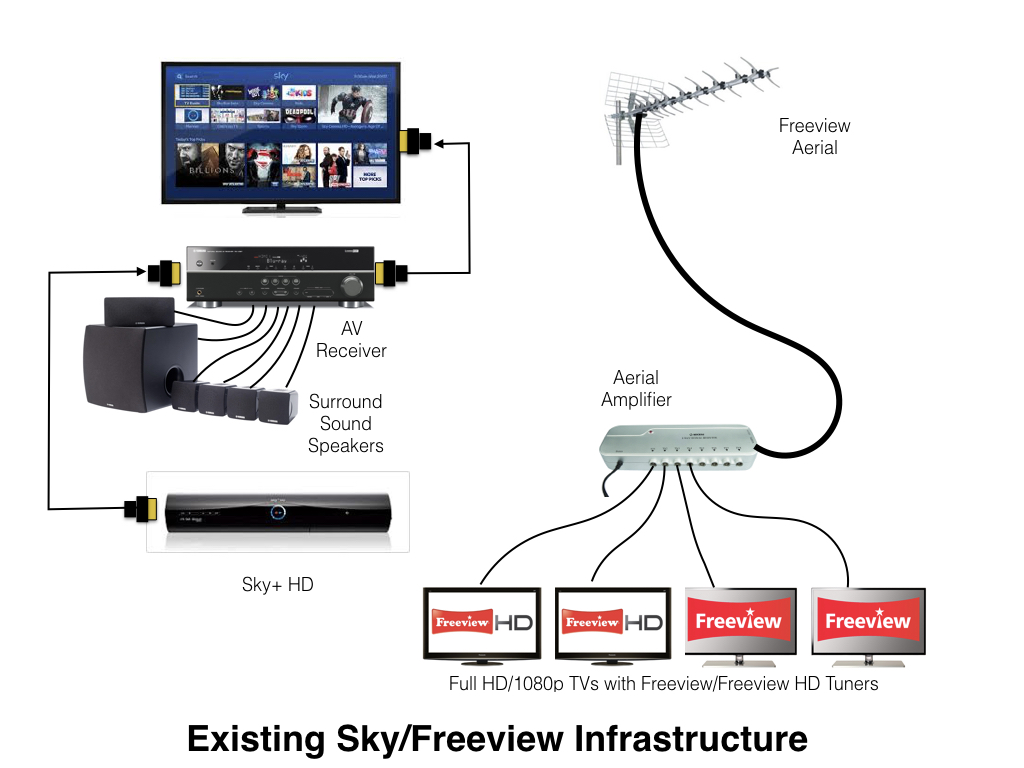
Our current set up
Shared Infrastructure:
- Freeview aerial on a mast attached to chimney
- Nikkai 8 way Aerial Amplifier with Digital Bypass
- Coaxial cable runs from the outputs of aerial amplifier to main reception rooms, kitchen and to 3 of the bedrooms
Living Room:
- Samsung 40” LED TV
- Yamaha AV Receiver and surround sound speakers
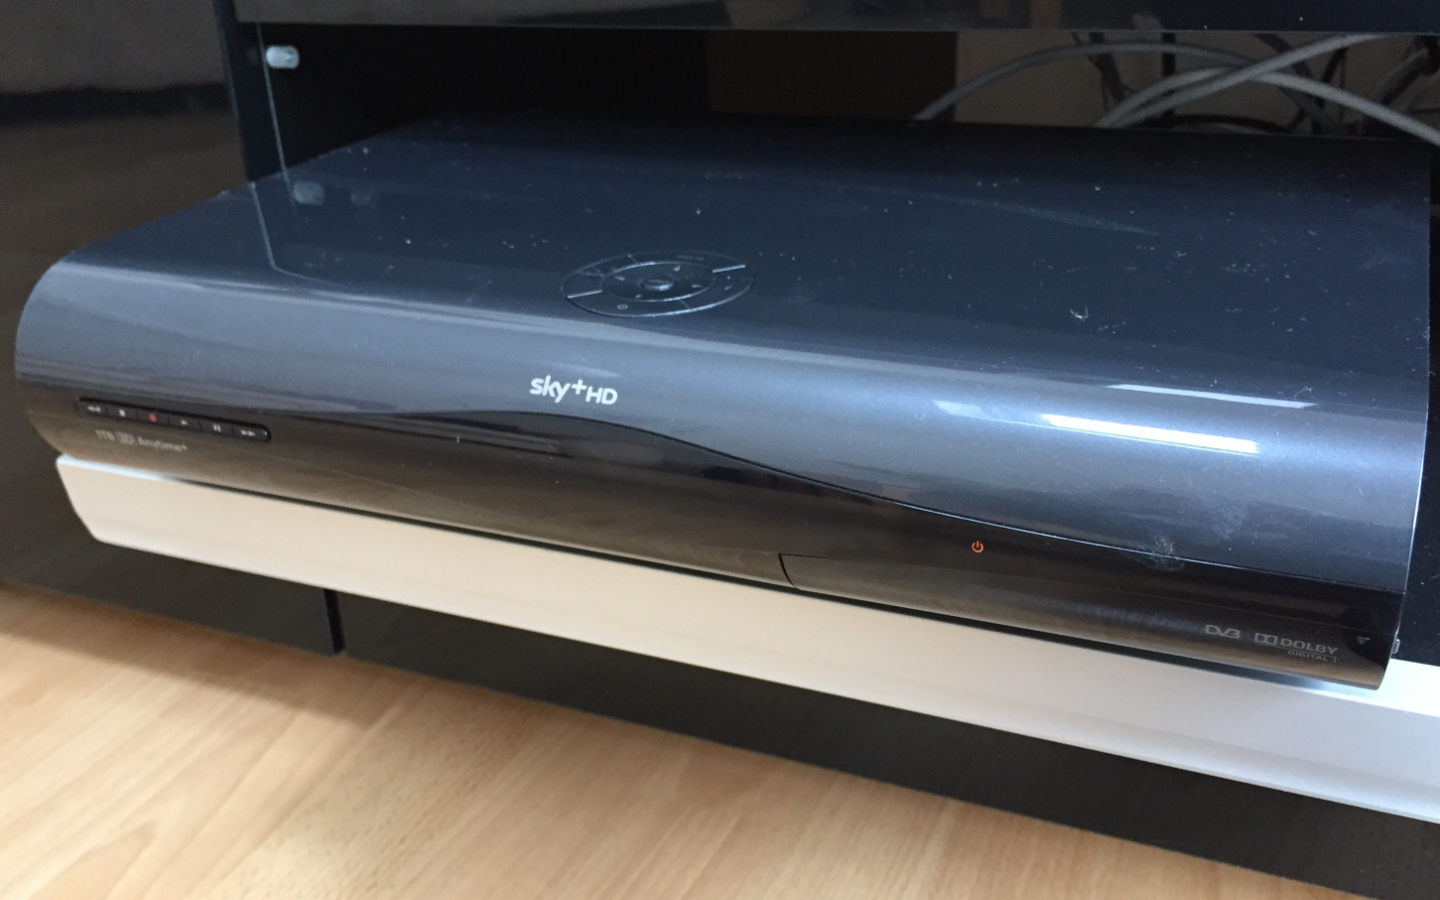
- Sky+ HD 1TB with Sky Box Sets and Sky Sports HD subscriptions
- BT Youview+ with BT Sport subscription
- Samsung Blu-ray Player
- Apple TV 4
- Logitech Harmony 650 universal remote
The Selection process
The main selection criteria were:
- the viewing experience on the other TVs had to be as close as possible to that on the main living room TV,
- the solution needed to be scalable so that multiple sources could be distributed simultaneously to multiple TVs,
- it must be easy to use for other members of the family,
- not require lots of additional cabling to be routed around the house, and
- cost – we didn’t want to spend too much of the money we had just saved (£728.53 over 12 months).
My research focussed on solutions that distributed full 1080p digital signals around the house. The main choices I found were:
- HDMI over Cat 6 cabling, either point to point or using a matrix switch
- HDMI over powerline
- HDMI modulation using coaxial cables
I discounted solutions that used wireless transmission as I had had a bad experience with a wireless sender a few years ago. I have also spent a lot of money, time and effort providing a seamless WiFi experience throughout the house and would prefer to limit WiFi access to computing devices.
HDMI over Cat 6 cables
It became obvious that HDMI over Cat 6 cabling was going to require lots of new cabling to be installed. Even though a point to point solution to join the living room to the family room would be feasible using external cabling, it didn’t address the kitchen or bedroom TVs well. The cost of using a HD matrix switch appeared to be quite high. It would need to be sited in the loft and I didn’t really have an appetite for all the additional cabling required for all the rooms.
HDMI over powerline
I next looked at HDMI over powerline. This looked like a good solution but the entry cost was quite high and it became clear that it wouldn’t be possible to have multiple sources available in parallel. Also some of the solutions I looked at couldn’t have more than one receiver. Therefore, it probably wouldn’t allow me to access the signal in more than one room outside of the living room.
HDMI modulation
The solution I ended up choosing was HDMI modulation. This provided the most flexible and cost effective solution for us. It would cater for HD sources up to 1080p. This is fine as we don’t need Ultra HD or 4K yet as we don’t have set top boxes or TVs that support the higher resolution.
HDMI modulation converts the HDMI output from a set top box, DVD/Blu-ray player, streaming device, games console etc into a RF signal that can be transmitted over conventional coaxial cable and merged with the incoming signal from a Freeview HD aerial.
The quality of the picture produced is excellent – its hard to tell the difference from the original. The only downside is that the audio signal is limited to stereo, so you can’t distribute surround sound. However, I only have a surround sound system in the living room and stereo would work just fine everywhere else in the house. However, by connecting a digital optical cable between the Sky+ HD, for example, and the AV receiver it is still possible to have surround sound in the living room while the HDMI output is limited to stereo for distribution to the other TVs around the house.
The beauty of the solution for us is that we can re-use the aerial amplifier in the loft and coaxial cabling to 11 TV sockets distributed around the house.
Proof of concept with HDMI modulation
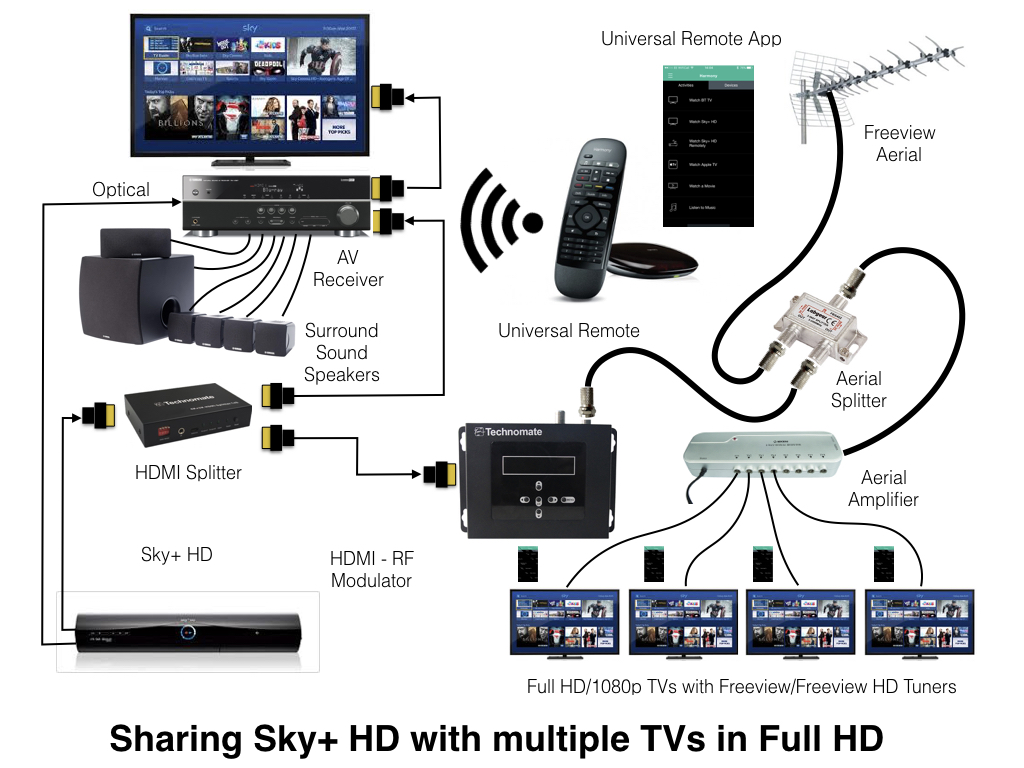
Initially we wanted to prove the concept with just our Sky+ HD box. We would need to buy an HDMI RF modulator to convert the HDMI signal into a DVB-T compatible signal. and an aerial splitter/combiner to merge the modulated HDMI signal with the Freeview aerial input in the loft. We would also need a HDMI Splitter, and 2 short HDMI leads, to share the HDMI output from the Sky+ HD box in the living room between the Yamaha AV receiver and the HDMI RF modulator. In addition, we needed a digital optical cable to re-enable the surround sound in the living room.
We selected the following products:
- *Technomate TM-RF HD – HDMI RF Modulator (Amazon)
- Technomate ™-2 HDSP-EDID – 2 Way HDMI Splitter with manual EDID selection (Technomate)
- Labgear 2 Way Splitter with Power Pass (Screwfix)
- Essentials 1 metre HDMI cable x 2 (PC World)
- LOGIK 1.5 metre Digital Optical Cable (PC World)
- Selection of twist-on F plugs, Coaxial Plugs and Coaxial Sockets (Screwfix)
*Since writing this post Technomate has discontinued the TM-RF HD and replaced it with the TM-RF HD IR. This device has a HDMI loop through so you shouldn’t need the 2 Way HDMI splitter that I used.
The total cost was around £180 – a quarter of the money that we have saved in the first 12 months by downsizing our Sky+ HD subscription.
At the same time we invested in a Logitech Harmony Companion (£119.99 from Maplin) to replace the older of the two Logitech Harmony 650 universal remotes we have. The included Harmony Hub would control the devices in the Living Room using the Companion handset. The Harmony app running on our iOS devices would allow us to remotely control the entertainment devices in the Living Room that were being used by the TVs in the other rooms. This wasn’t essential to the new set up for sharing our Sky+ HD, as the excellent Sky+ app allows us to completely control a Sky+ HD box, wherever we are. However, it would be useful for controlling the BT Youview+ box in the future, and anyway we needed to replace a broken Harmony 650 in the Family Room.
The solution we ended up with looks like this:
Installation
First I ran a second coaxial cable from the living room up into the loft (there is a pre-existing coaxial cable coming down from the aerial amplifier which we use for the BT Youview+ box). I took the cable through the wall and up the outside of the house and then back through the wall into a bedroom cupboard and then up through the ceiling into the loft. This saved me from having to go up too high on a ladder. The living room end of the cable was terminated at a new 2 way TV socket face plate. On the loft end of the cable I fitted a push on F plug compatible with the aerial splitter.
If you don’t need a Freeview signal in the living room, you could potentially reconfigure the cable from your aerial amplifier to the living room TV to be an input to the aerial amplifier instead.
I then used the new aerial splitter in the loft to combine the new input from the living room with the aerial input using the aerial splitter in reverse and then connected the combined cable on the other side of the aerial splitter into the UHF socket on the aerial amplifier.
Back downstairs, I took the HDMI cable from the Sky+ HD to the AV receiver and unplugged the AV receiver end and plugged it into the HDMI splitter input. I then connected the two new HDMI cables into the output sockets of the HDMI splitter. One was then connected to the AV receiver and the other to the HDMI modulator. To ensure the signal going through the HDMI splitter would work correctly with both the AV receiver and the HDMI modulator, I set the DIP switches to a setting the covered both 1080i and 1080p. This would ensure that the AV receiver wouldn’t get confused as it did with a HDMI splitter with automatic EDID that I had tried.
Finally, I made up a new coaxial cable to connect the HDMI modulator to the vacant TV socket on the new TV socket face plate (connecting it to the new cable I had just routed up into the loft). On one end I fitted a push on F plug compatible with the output connector on the HDMI modulator. On the other end I fitted a coax plug. Once that cable was fitted, the installation was finished and we could move on to setting up the HDMI modulator.
Setting up the HDMI modulator
By default the Technomate TM-RF HD uses channel 69 of the Freeview signal (not to be confused with the channel number in the Freeview Guide) and a Logical Channel Number (LCN) of 800 (this is the channel number in the Freeview Guide). After trying the default settings and checking that everything worked, I changed the channel number to 21 (nothing is broadcast on that channel it our area) and the LCN to 7. This is the first free number in our area as we don’t receive BBC4 HD which is normal on LCN 7.
Setting the LCN to a low number is essential for set top boxes like the NowTV Smart Box, which we use its the kitchen, as there is no way to enter a channel number and it is a pain to have to scroll through all the channels to get to the channel carrying the Sky signal.
Retuning the TVs
To view the new Sky channel (in our case 7) on all the Freeview and Freeview HD TVs I had to retune all the TVs to pick up the new channel. The new channel was picked up fully on all the TVs which are either full HD, i..e. 1080p, or had a Freeview HD tuner or both. On TVs which were neither full HD nor had a Freeview HD tuner only the audio was picked up. Luckily we only had one television that only picked up the audio signal. All the rest just worked.
Viewing Sky+ HD on remote TVs
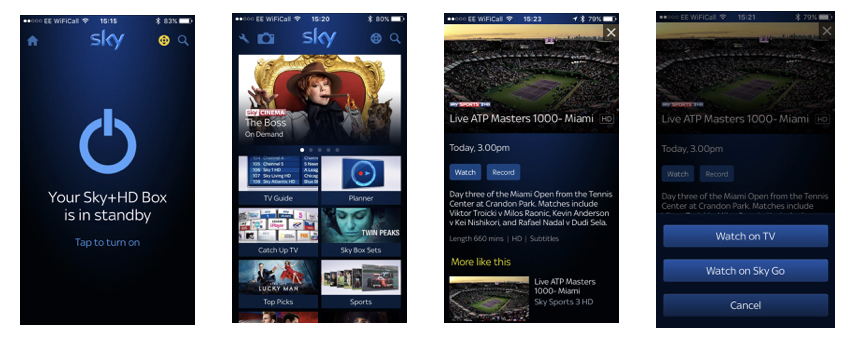
To view Sky on a remote TV you first need to select the Freeview channel you assigned in the HDMI modulator (in our case 7) via the TV’s remote control and then you simply control Sky through the Sky+ app on your mobile device.
A second way of controlling Sky is using the Harmony app on your mobile device. This is not as elegant as the Sky+ app, as it doesn’t have direct access to the Sky Guide or the contents of your planner. However, it will be the way we will have to control BT Youview+ when I connect it up to a second HDMI modulator sometime in the future.
Sky Magic Eye
If you already use the RF2 out on the Sky+ HD to distribute an analogue signal throughout your house, you may have some Magic Eyes dotted around the house. If so, it should be fairly straightforward to connect the output of the HDMI modulator to the RF in of the Sky+ HD and still use the Magic Eyes to repeat the IR signals from your Sky remote control.
I had set up Magic Eyes successfully in our last house, but I have struggled in our current house. The most important thing this time was to share HD channels from our Sky+ HD in full quality. I did try setting up a Magic Eye on the family room tv with the kit I had available but gradually came to the conclusion that it was taking too much effort to debug. I was also reluctant to spend any addition money on getting it working. My wife seems happy controlling Sky using the app, so I’m not going to worry.
Conclusion
HDMI modulation provides a high quality and cost effective solution for distributing digital HD video sources around your house, especially if you have an existing coaxial infrastructure with aerial amplification/distribution capability. However, if you are refurbishing your house and don’t mind doing loads of cable runs then distributing HD, and potentially UHD/4K, using Cat 6 cables and a HD matrix may be a better future proofed solution for your house. However, if you’re in neither situation and you don’t want to run any extra cables around your house then HDMI over powerline could well be the answer.